A Coconut Chocolate treat recipe

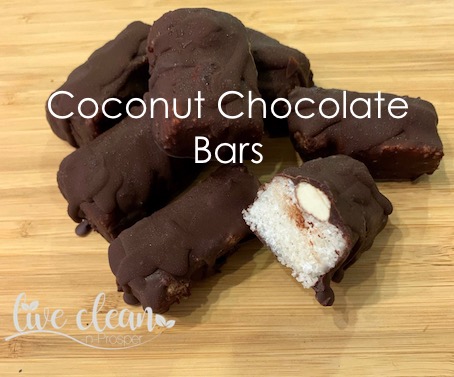
Today I’m sharing with you a Coconut Chocolate bar or treat recipe.

 I saw this recipe on a site called Paleo Grubs a long time ago and always wanted to try it.

With Easter approaching, I thought it was a good excuse to make these treats. Using healthy ingredients such as coconut, coconut oil, honey and raw chocolate.  The result is similar to a Bounty Bar.

They are relatively easy to make. The hardest part is coating them in the chocolate.

Coconut Chocolate Bars

Makes 14 bars

Ingredients 
For the Bars

 1 ½ cups unsweetened fine shredded coconut

¼ cup coconut oil – melted

1/3-cup raw honey

1-teaspoon pure vanilla extract

28 raw natural almonds

For the Chocolate Coating 

my preference – Raw Chocolate coating

100g cocoa butter

50 g cocoa powder

33 g maple syrup

dash of vanilla extract

pinch of salt

or 

( use 1 cup processed dark choc chips & 1 tablespoon coconut oil )

Method

* Line a loaf tin with baking paper

* Place the coconut, coconut oil, honey and vanilla extract in a food processor and process till well mixed. The mixture will start to create a ball.

* Put the mix into the pan and press out evenly

* Using a knife of spatula, push into the mixture dividing it into 7 rows as well as in half length ways.

* Place 2 almonds on each section, lightly pressing them into the top of the coconut mixture

* Place the tin in the fridge overnight.

* Remove the tin from the fridge and grasping the edges of the baking paper, lift up the coconut block. Place it on a board and cut into the rows, creating 14 mini bars.

Make your preferred chocolate coating by melting and mixing your measured ingredients in a bowl over a saucepan of simmering water.

* Using tongs carefully dip each coconut bar into the chocolate, ensuring all sides are coated, and placing them on a tray lined with baking paper.

Notes

I coated mine twice. I had plenty of chocolate mixture and the first coating was quite thin.

I placed the tray in the freezer for 5 min after the first coat, keeping the rest of the chocolate melted in the bowl sitting over the saucepan. Then I quickly dipped each bar a second time.

The colder the bars, the quicker the chocolate set on the bar. I then put the tray back in the fridge for a couple of hours to ensure the chocolate was completely set before transferring to a container.

These bars need to be kept refrigerated, in an airtight container until serving. As the chocolate has no added stabilizers, it will melt faster when left as room temperature.

Making your own treats is a way of minimizing your intake of highly processed sugars and chemicals such as artificial flavours, colours and preservatives.

I hope you enjoy making these Coconut Chocolate bars for your family.

Till the next post,

Live clean n prosper

Raw Raspberry & Chocolate Slice

Today I’m sharing a recipe for a Raw Raspberry & Chocolate Slice.

I was looking through my recipes this week and came across this recipe that I had saved from one of those free magazines you can get from the supermarket.
It is an easy recipe to make and tastes very nice, sort of a spin on ‘cherry ripe’.

Having the raw chocolate topping helps to keep this slice healthier.

Raw Raspberry & Chocolate Slice

Makes approx. 12 pieces

Ingredients

Base
3/4 cup almond meal
10 pitted dates
1 ½ tbsp. cacao powder
2 ½ tbsp. almond butter
1 tbsp honey

Filling
1 cup raw, natural cashews
250g fresh raspberries
½ cup desiccated coconut
2/3 cup coconut oil
1 tsp vanilla paste
1/3 cup honey

Chocolate topping
40g cacao butter
1 tbsp. coconut oil
1/3 cup cacao powder
2 tbsp. maple syrup

Method
Prepare a 20 x 20 cm tin by lining with baking paper
* For the Base – Place all of the ingredients into a food processor and mix until combined.
* Spread the mixture over the base of the tin, pressing it out evenly and refrigerate.

* For the filling – process the cashews until they are fine crumbs.
* Add the remaining ingredients and process for 2 minutes until the mixture looks smooth and creamy. Pour the mix over the base spreading it evenly. Return the tin to the fridge for 20 minutes.

* To make the chocolate topping, melt the cacao butter and coconut oil and mix in the cacao powder and maple syrup. Once well combined, pour the chocolate over the raspberry filling. You will need to work quickly as the chocolate may start to set if the filling is really cold.

Refrigerate till the chocolate is hard, then lift from the tin and slice into squares.
The slice will need to be kept refrigerated till served.

I think this recipe could be made using different berries if raspberries are not to your taste.

I hope you enjoy this slice as much as we did.

Till the next post,

Live clean n Prosper

A Choc-Orange Slice recipe

Today I’m sharing another recipe, this time featuring Oranges.

At this time of the year our orange trees are full of fruit and I like to find different ways of using it.

What I like about this recipe is that it uses the whole fruit and nothing is wasted. You get every bit of nutrition out of the fruit.

I have previously written about the health benefits of Oranges, of which there are many.

As is usually the way with many fruits, eating an orange is healthier than just drinking the juice. With this recipe, you eat the peel as well, which actually contains higher amounts of some nutrients than the flesh.

This slice is wheat free and almost dairy free (the eggs) and tastes amazing when served a little warm with cream or yoghurt.

 Choc-Orange Slice

Makes 16 pieces

 Ingredients

2 whole organic oranges (about 400gm weight)

4 large eggs

100 gms desiccated coconut

75 gms almond meal

100 gms rapadura sugar

2 tbsp maple syrup (or rice malt syrup)

3 tbsp cacao

2 tsp bi carb soda (or baking powder)

 Method

  • Wash oranges and put them in a large saucepan, covering them with water. (Put a small plate on top of the oranges to stop them floating.)
  • Bring to boil, and then simmer for approximately 40 minutes till the skins have softened.
  • Take the oranges from the water, cut them into quarters and allow to cool.
  • Remove any pips and place the pieces into a food processor.
  • Process till you have a smooth pulp.
  • Add the eggs and maple syrup processing till just mixed.
  • Add the dry ingredients and process till combined.
  • Pour the mixture into a prepared 20 x 20 cm tin and bake at 180* for approx. 1 hr until firm to the touch.
  • Allow the slice to cool a while before removing it from the tin and cutting into squares.

** Variations **

  • If you have a nut allergy you can swap out the almond meal for more coconut.
  • If you don’t want the chocolate, just leave it out.

A bit about Orange peel

Although orange peels are edible, they are not nearly as sweet or as juicy as the pulp.

It may surprise you that the skins have about four times more health benefits than the actual orange fruit that we eat.

Orange peel actually has more fibre than the fruit inside. The pith of the orange — the white part between the skin and fruit — can be sour or bitter but actually contains just as much vitamin C as the fruit itself.

The orange peel contains flavonoids and other phyto-chemicals that are highly beneficial for our health. Flavonoids are antioxidant compounds that help prevent chronic diseases such as cancer and heart diseases.

Orange peels contain several B vitamins, vitamins A and C. In addition, the peel contains considerable amounts of copper, calcium and magnesium.

(Sources:  www.livescience.com, www.manipalhospitals.com, www.articles.mercola.com)

Also keep in mind, that unless you’re eating peel from an organic orange, it could be covered in chemicals.

I hope you enjoy this slice as much as we do.

Till the next post,

Live clean n Prosper