Coconut, Ginger and Lime biscuits

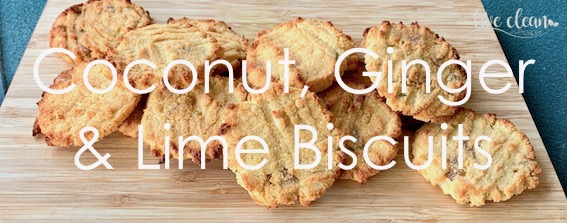
Today I’m sharing a biscuit recipe using coconut flour.

In my last post I wrote about the health benefits of using coconut flour in cooking. I had previously made a coconut flour shortbread using a paleo recipe I had.

Let’s just say the result was not great. So I went in search of a new recipe to play with.

Here it is.

 Coconut, Ginger and Lime biscuits.

Makes 12 to 15

You could swap out the ginger and lime for other dried fruits such as raisins or apricots, if ginger is not your thing.
 Ingredients

1/3 cup coconut flour

1 tbsp desiccated coconut

zest of ½ lime

30 gms chopped naked ginger (un-crystallised)

45 gms melted butter

¼ cup honey

2 eggs, lightly beaten

1 tsp vanilla extract

pinch of salt

Method

Preheat the oven to 170’c

  • Mix together the coconut flour, lime zest, salt, coconut
  • Add the melted butter, vanilla and honey and mix well
  • Then add the eggs and continue to stir the mixture till it becomes thick.
  • Now add in the ginger, making sure the pieces are evenly distributed through the mix.
  • Using a spoon, portion out the mix onto a lined baking tray. (I used my ½ tbsp. scoop) and press into shape.
  • Place the tray in the center of your oven and bake for about 15 to 18 minutes until the biscuits start to turn a nice golden colour.
  • Place on a rack to cool.

I made this recipe twice to work out the best way to bake the biscuits. The first batch I made was a thicker cookie style and baked for 15 minutes at 180’c. The second batch I made thinner and cooked them at 170’c for 18 min. Both batches resulted in a soft textured biscuit.

If you like coconut and ginger, have a go at baking these. They are a healthy biscuit treat full of good fibre and beneficial ginger.

I hope you enjoy them.

Till the next post,

 Live clean n prosper

Lime & Poppy Seed Slice

Today I’m sharing a Poppy Seed slice recipe.

I saw a recipe for a gluten free Poppy seed slice in the paper recently and decided to give it a try. Our lime tree is full of fruit at the moment so that became the citrus flavour of choice.

You could make this recipe using lemon or orange if you prefer.

Poppy Seeds also have health benefits

Poppy Seeds also have a number of impressive nutritional components that can help your body improve or maintain optimal function.

Each serving of poppy seed contains a considerable amount of linoleic acid, an omega-6 fatty acid that offers protection against heart disease.

Poppy seeds contain iron and phosphorus, minerals essential for the maintenance of both muscles and bones.

These little seeds also contain calcium, iron and magnesium. The minerals needed by the body to regulate brain activity and the development of neurons. They also aid in the production of neurotransmitters.

Poppy seeds have high amounts of dietary fibre, which aids the digestive system in metabolising and smoothly processing ingested food, preventing constipation and other digestive problems.

The abundance of copper and iron in poppy seeds improves red blood cell formation, which helps in the prevention of anemia and other blood-related conditions.

Lime Poppy Seed Slice

Ingredients

¼ cup of Maple syrup

¼ cup lime juice

1 tsp chia seeds

about 1 tsp lime zest

1 tsp vanilla paste/extract

4 eggs – separated

1 cup almond flour

½ cup green banana flour

1 tsp baking powder

¼ cup poppy seeds

pinch of salt

 Method

Preheat your oven to 180’c

In a large mixing bowl, combine the syrup, lime juice, zest, chia seeds, egg yokes and vanilla and leave to sit.

In another bowl, beat the egg whites till stiff, adding the salt part way through.

Now add the flour, baking powder and poppy seeds to the other ingredients, mixing well.

Fold in the egg whites till combined then place the mix into a square tin, smoothing the top.

Bake till cooked through and lightly golden, approx. 20 to25 minutes.

Cool completely before removing it from the tin and cutting into squares.


I made a simple Cream Cheese topping, which can be added at time of serving.

Mix 100 grams of spreadable cream cheese with 1 tsp vanilla and 1 tsp maple syrup.

We just spread a small amount on each slice with a little added zest.

 I hope you enjoy making and eating this slice.

Till the next post,


Live clean n Prosper

Baking with Banana Flour

Todays post is about baking with banana flour.

After doing the research on banana flour last week, I thought I would find and trial an easy recipe. It appears that you can substitute banana flour directly for wheat flour in your baking. The flour has a texture similar to lighter wheat flours and requires about 25% less volume.

The flour has similar baking characteristics to wheat flour, but is 100% gluten free, which makes it a perfect choice for coeliacs, people with gluten intolerance or those trying to avoid wheat. It’s readily available in the health food section of the supermarket.

Due to the high resistant starch content of the flour, you tend to eat less of whatever you cook with it, as a small amount tends to be filling.

I baked 3 different cakes with the banana flour to determine which recipe to share with you. I chose the chocolate cake one as it has the least ingredients and is usually the most popular.

Banana Flour Chocolate Cake

Ingredients

1 cup Green Banana Flour

2 teaspoons baking powder

3 tablespoons of cacao powder

½ cup maple syrup (or rice malt)

140 grams melted butter (or oil of your choice)

½ cup of milk (type of your choice)

½ cup water

2 eggs

Method
  • Preheat oven to 180’ C and prepare your baking tin (I used a 20cm loaf tin)
  • In a large mixing bowl combine flour, baking powder and cacao
  • Add melted butter, syrup, milk, water and eggs mixing well.
  • Pour batter into tin and bake for 35 to 40 minutes until a skewer inserted into the cake comes out clean (or slightly tacky for a moister cake).
  • Allow to cool completely before removing from tin.

** On my first attempt the cake was a little dry so for the second one I followed this tip I found. Very happy with the result.

Cooking Tip – Cook the cake for ½ of the time uncovered as usual and then cover with foil for the remaining time.

I hope you enjoy your baking experience.

Till the next post,

Live clean n Prosper